Oct 7, 2015

Swagger - The API documentation

Most of are using web service APIs in daily codes, but there is no real standard used or implementation for the same. While surfing and searching about the documentation of such service API, I've come across following links which would be beneficial for the people those who want to understand the service documentations and their usage and implementations..

Swagger Wiki

Documenting WS using Swagger

RestFul API documentation using Swagger


Web Services Testing using SoapUI and Groovy

Found a good fundamentals about webservices testing or SOA with SoapUI and the prerequisites needed for the same. You can take a look at your free time, this will also helpful for the people who are looking for how to carry out functional testing of webservices using groovy.

Jul 22, 2015

Sending email attachment with test execution status [PASSED or FAILED]- Java Code Examples

import java.util.Properties;

import javax.activation.DataHandler;
import javax.activation.DataSource;
import javax.activation.FileDataSource;
import javax.mail.Message;
import javax.mail.Multipart;
import javax.mail.Session;
import javax.mail.Transport;
import javax.mail.internet.InternetAddress;
import javax.mail.internet.MimeBodyPart;
import javax.mail.internet.MimeMessage;
import javax.mail.internet.MimeMultipart;

public class SendMail {
    public static void execute(String reportFileName) throws Exception {

        String[] to = { "<email address of recipient>" };
        String[] cc = {};
        String[] bcc = {};

        SendMail.sendMail(
                "<FROM EMAIL ADDRESS>",
                "<PASSWORD>",
                "smtp.gmail.com",
                "465",
                "true",
                "true",
                true,
                "javax.net.ssl.SSLSocketFactory",
                "false",
                to,
                cc,
                bcc,
                "Automation <SUBJECT>",
                "This is auto generated email for <Project Name> Automation after test suite run! "
                        + "Please check attachment for the detailed report and do not hit reply button...",
                <PATH OF html file, resides under test-output folder>, reportFileName);
    }

    public static boolean sendMail(String userName, String passWord, String host, String port,
            String starttls, String auth, boolean debug, String socketFactoryClass,
            String fallback, String[] to, String[] cc, String[] bcc, String subject, String text,
            String attachmentPath, String attachmentName) {

        Multipart multipart = new MimeMultipart();
        MimeBodyPart messageBodyPart = new MimeBodyPart();

        // Object Instantiation of a properties file.
        Properties props = new Properties();
        props.put("mail.smtp.user", userName);
        props.put("mail.smtp.host", host);
        if (!"".equals(port)) {
            props.put("mail.smtp.port", port);
        }
        if (!"".equals(starttls)) {
            props.put("mail.smtp.starttls.enable", starttls);
            props.put("mail.smtp.auth", auth);
        }
        if (debug) {
            props.put("mail.smtp.debug", "true");
        } else {
            props.put("mail.smtp.debug", "false");
        }
        if (!"".equals(port)) {
            props.put("mail.smtp.socketFactory.port", port);
        }
        if (!"".equals(socketFactoryClass)) {
            props.put("mail.smtp.socketFactory.class", socketFactoryClass);
        }
        if (!"".equals(fallback)) {
            props.put("mail.smtp.socketFactory.fallback", fallback);
        }
        try {
            Session session = Session.getDefaultInstance(props, null);
            session.setDebug(debug);
            MimeMessage msg = new MimeMessage(session);

            MimeBodyPart htmlPart = new MimeBodyPart();
            htmlPart.setContent(text, "text/html");
            multipart.addBodyPart(htmlPart);

            DataSource source = new FileDataSource(attachmentPath);
            messageBodyPart.setDataHandler(new DataHandler(source));
            messageBodyPart.setFileName(attachmentName);

//THIS CODE GIVIES THE STATUS IN EMAIL SUBJECT FOR PASS OR FAILING OF TESTS
            if (((String) messageBodyPart.getContent()).contains("FAILED TESTS"))
                msg.setSubject("FAILED :: " + subject);
            else if (((String) messageBodyPart.getContent()).contains("PASSED TESTS"))
                msg.setSubject("PASSED :: " + subject);

            multipart.addBodyPart(messageBodyPart);

            msg.setContent(multipart);
            msg.setFrom(new InternetAddress(userName));

            for (int i = 0; i < to.length; i++) {
                msg.addRecipient(Message.RecipientType.TO, new InternetAddress(to[i]));
            }

            for (int i = 0; i < cc.length; i++) {
                msg.addRecipient(Message.RecipientType.CC, new InternetAddress(cc[i]));
            }

            for (int i = 0; i < bcc.length; i++) {
                msg.addRecipient(Message.RecipientType.BCC, new InternetAddress(bcc[i]));
            }

            msg.saveChanges();

            Transport transport = session.getTransport("smtp");
            transport.connect(host, userName, passWord);
            transport.sendMessage(msg, msg.getAllRecipients());
            transport.close();

            return true;

        } catch (Exception mex) {
            mex.printStackTrace();
            return false;
        }
    }
}
Jul 2, 2015

How to pass date in DatePicker control of JQuery through JAVA and Selenium

Passing the date in DatePicker control of JQuery using JAVA code..

((JavascriptExecutor) driver)
                .executeScript("document.getElementById('<element_Id>').removeAttribute('readonly',0);");
WebElement fromDate = findElement("element_Id");
fromDate.clear();
fromDate.sendKeys(<DATE IN REQ FORMAT eg : 07/02/2015>);

How to get past and future dates in JAVA

Java Code to get the current date, previous date and future date.

Import libraries ::
import java.text.DateFormat;
import java.text.SimpleDateFormat;
import java.util.Calendar;
import java.util.GregorianCalendar;


CODE::
DateFormat format = new SimpleDateFormat("MM-dd-yyyy");
Calendar date = new GregorianCalendar();
System.out.println("Current Date :: " + format.format(date.getTime()));
date.add(Calendar.DATE, -30);
System.out.println("Previous Date :: " + format.format(date.getTime()));
date = new GregorianCalendar();
System.out.println("Current Date :: " + format.format(date.getTime()));
date.add(Calendar.DATE, +30);
System.out.println("Next Date :: " + format.format(date.getTime()));

Jun 16, 2015

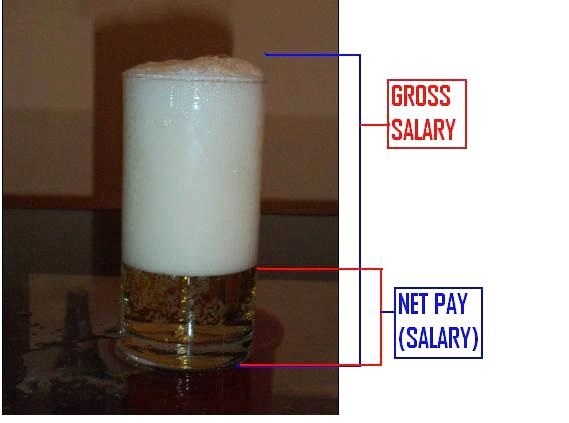
IMPORTANT :: Know your salary slip..

Most of us like me do not spend much time in understanding our salary slips or never gives attention to it. We may never come to know what are we getting and what are we paying as tax!!


Read on below link to know more!!!

https://scripbox.com/blog/everything-you-need-to-know-about-your-salary-slip/?utm_source=linkedin&utm_medium=social&utm_content=salary-slip&utm_campaign=blogpost

Jun 10, 2015

Step-by-step guide to Online Income tax filing in INDIA

Big Thanks to my friend Kedar J. for the compilation!!!

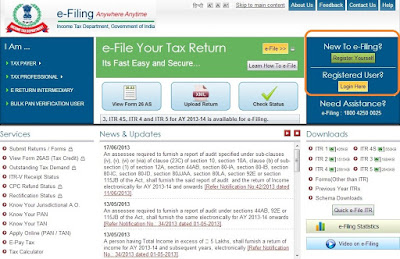
1) Log on to https://incometaxindiaefiling.gov.in/e-Filing/


If you are first time user, click “Register Yourself” and follow the process.
Click “Login Here” if you already have registered and enter your credentials to log in

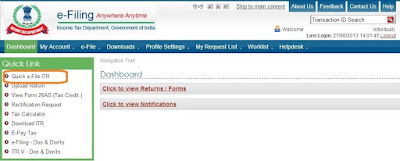
12)  Here is what you see after logging in
              

Click “Quick e-File ITR”

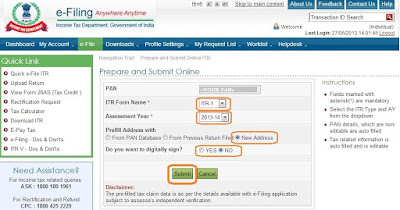
3)      You will land in following page 

a.       Ensure you have correct PAN
b.      Fill ITR form name – typically ITR-1 for most of the cases
c.       Assessment Year  = 2013-14
d.      Prefill Address with = “New Address”
e.      Digital sign = NO
f.   Click “Submit”

        
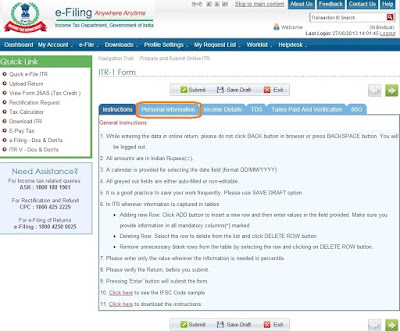
      4)      On submitting a details form shows up


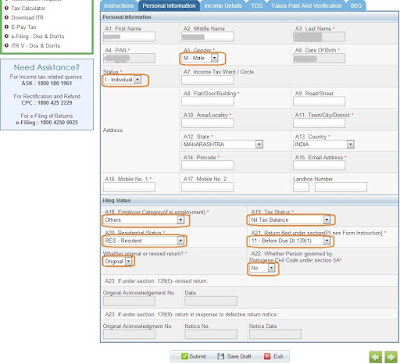
     5)      Personal Information


a.      Please fill up the highlighted fields as applicable in “Personal Information
                          b. For most of us, the Filing Status section will be as shown above.
      6)      Income Details are to be filled by individual as per their Form 16
       Fill up all the required fiends from Form 16

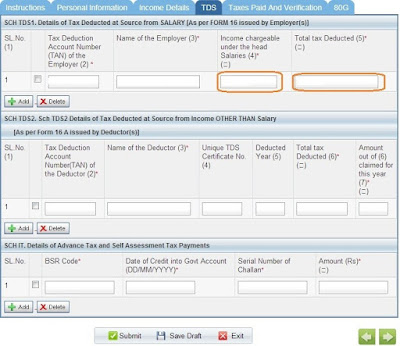
     7)      Now the TDS section

Only following fields are to be filled from Form 16
a.      Income chargeable under the head “Salaries”
b.      Total tax deducted 


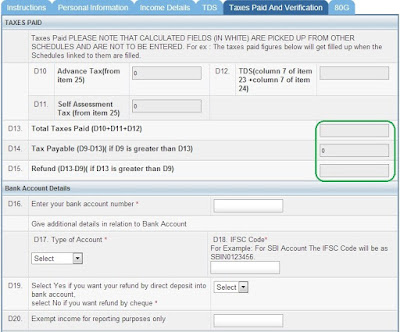
    8)      Taxes Paid And Verification
a.      Ensure the green outlined fields are appropriate.


     9)      Submission process
·         Keep ‘Saving the draft’ to save your changes
·         Finally once everything is filled, click the “Submit” button.
    10)      What next?
·         Wait till you get the email from income tax department.
·         Open the PDF in the email’s attachment, (which has password: <PANDOB> 
·         Take a printout of that PDF doc (of course after carefully verifying everything)
·         Sign it and post it to the address given on that doc. (don’t forget to affix Rs. 10 stamps)


Jun 2, 2015

Eclipse IDE keyboard shortcuts for JAVA

Eclipse shortcuts

Keyboard Command
Purpose
Ctrl+N
Create new project using the Wizard
Ctrl+Alt+N
Create new project, file, class, etc.
Alt+f, then .
Open project, file, etc.
Ctrl+Shift+R
Open Resource (file, folder or project)
Alt+Enter
Show and access file properties
Ctrl+S
Save current file
Ctrl+Shift+S
Save all files
Ctrl+W
Close current file
Ctrl+Shift+W
Close all files
F5
Refresh content of selected element with local file system
F12
Jump to Editor Window
Ctrl+Page Down/Ctrl+Page Up
Switch to next editor / switch to previous editor
Ctrl+M
Maximize or un-maximize current Editor Window (also works for other Windows)
Ctrl+E
Show list of open Editors. Use arrow keys and enter to switch
Ctrl+F6/Ctrl+Shift+F6
Show list of open Editors. Similar to ctrl+e but switches immediately upon release of ctrl
Alt+Arrow Left/Alt+Arrow Right
Go to previous / go to next Editor Window
Alt+-
Open Editor Window Option menu
Ctrl+F10
Show view menu
Ctrl+F10, then n
Show or hide line numbers
Ctrl+Shift+Q
Show or hide the diff column on the left (indicates changes since last save)
Home/End
Jump to beginning / jump to end of indention. Press home twice to jump to beginning of line
Ctrl+Home/End
Jump to beginning / jump to end of source
Ctrl+Arrow Right/Arrow Left
Jump one word to the left / one word to the right
Ctrl+Shift+Arrow Down/Arrow Up
Jump to previous / jump to next method
Ctrl+L
Jump to Line Number. To hide/show line numbers, press ctrl+F10 and select 'Show Line Numbers'
Ctrl+Q
Jump to last location edited
Ctrl+./Ctrl+,
Jump to next / jump to previous compiler syntax warning or error
Ctrl+Shift+P
With a bracket selected: jump to the matching closing or opening bracket
Ctrl+[+]/Ctrl+- on numeric keyboard
Collapse / Expand current method or class
Ctrl+[/]/Ctrl+* on numeric keyboard
Collapse / Expand all methods or classes
Ctrl+Arrow Down/Ctrl+Arrow Up
Scroll Editor without changing cursor position
Alt+Page Up/Alt+Page Down
Next Sub-Tab / Previous Sub-Tab
Shift+Arrow Right/Arrow Left
Expand selection by one character to the left / to the right
Ctrl+Shift+Arrow Right/Arrow Left
Expand selection to next / previous word
Shift+Arrow Down/Arrow Up
Expand selection by one line down / one line up
Shift+End/Home
Expand selection to end / to beginning of line
Ctrl+A
Select all
Alt+Shift+Arrow Up
Expand selection to current element (e.g. current one-line expression or content within brackets)
Alt+Shift+Arrow Left/Arrow Right
Expand selection to next / previous element
Alt+Shift+Arrow Down
Reduce previously expanded selection by one step
Ctrl+C/Ctrl+X/Ctrl+V
Cut, copy and paste
Ctrl+Z
Undo last action
Ctrl+Y
Redo last (undone) action
Ctrl+D
Delete Line
Alt+Arrow Up/Arrow Down
Move current line or selection up or down
Ctrl+Alt+Arrow Up/Ctrl+Alt+Arrow Down/
Duplicate current line or selection up or down
Ctrl+Delete
Delete next word
Ctrl+Backspace
Delete previous word
Shift+Enter
Enter line below current line
Shift+Ctrl+Enter
Enter line above current line
Insert
Switch between insert and overwrite mode
Shift+Ctrl+Y
Change selection to all lower case
Shift+Ctrl+X
Change selection to all upper case
Ctrl+F
Open find and replace dialog
Ctrl+K/Ctrl+Shift+K
Find previous / find next occurrence of search term 
Ctrl+H
Search Work-space 
Ctrl+J/Ctrl+Shift+J
Incremental search forward / backwards. Type search term after pressing ctrl+j, there is now search window
Ctrl+Shift+O
Open a resource search dialog to find any class
Tab/Shift+Tab
Increase / decrease indent of selected text
Ctrl+I
Correct indention of selected text or of current line
Ctrl+Shift+F
Autoformat all code in Editor using code formatter
Ctrl+/
Comment / un-comment line or selection
Ctrl+Shift+/
Add Block Comment around selection
Ctrl+Shift+\
Remove Block Comment
Alt+Shift+J
Add Element Comment 
Ctrl+Space
Opens Content Assist 
Ctrl+1
Open Quick Fix and Quick Assist
Alt+/
Propose word completion. Repeatedly press alt+/ until reaching correct name
Ctrl+Shift+Insert
Deactivate or activate Smart Insert Mode 
Ctrl+O
Show code outline / structure
F2
Open class, method, or variable information 
F3
Open Declaration: Jump to Declaration of selected class, method, or parameter
F4
Open Type Hierarchy window for selected item
Ctrl+T
Show / open Quick Type Hierarchy for selected item
Ctrl+Shift+T
Open Type in Hierarchy
Ctrl+Alt+H
Open Call Hierarchy
Ctrl+U
Find occurrences of expression in current file
Ctrl+move over method
Open Declaration or Implementation
Alt+Shift+R
Rename selected element and all references
Alt+Shift+V
Move selected element to other class or file 
Ctrl+Shift+C
Change method signature
Alt+Shift+M
Extract selection to method
Alt+Shift+L
Extract local variable: Create and assigns a variable from a selected expression
Alt+Shift+I
Inline selected local variables, methods, or constants if possible 
Ctrl+F11
Save and launch application (run)
F11
Debug
F5
Step Into function
F6
Next step (line by line)
F7
Step out
F8
Skip to next Breakpoint
Ctrl+F7/Ctrl+Shift+F7
Switch forward / backward between views (panels). Useful for switching back and forth between Package Explorer and Editor.
Ctrl+F8/Ctrl+Shift+F8
Switch forward / backward between perspectives
Ctrl+P
Print
F1
Open Eclipse Help
Shift+F10
Show Context Menu right click with mouse
Ctrl+Alt+S
Synchronize with Repository
Ctrl+Alt+C
Commit
Ctrl+Alt+U
Update
Ctrl+Alt+D
Update to Revision
Ctrl+Alt+E
Merge
Ctrl+Alt+T
Show Properties
Ctrl+Alt+I
Add to svn:ignore

Jun 1, 2015

Best way to format Eclipse code

https://github.com/jokeyrhyme/eclipse-formatter-profiles/blob/master/google-style-guide-javascript-eclipse.xml

1.       Save this XML on local machine
2.       In formatter, import the saved xml
3.       Click Apply and OK.

Add it in Eclipse formatter.. 


and using shortcut keys (ctrl+shift+f) it formats entire file.